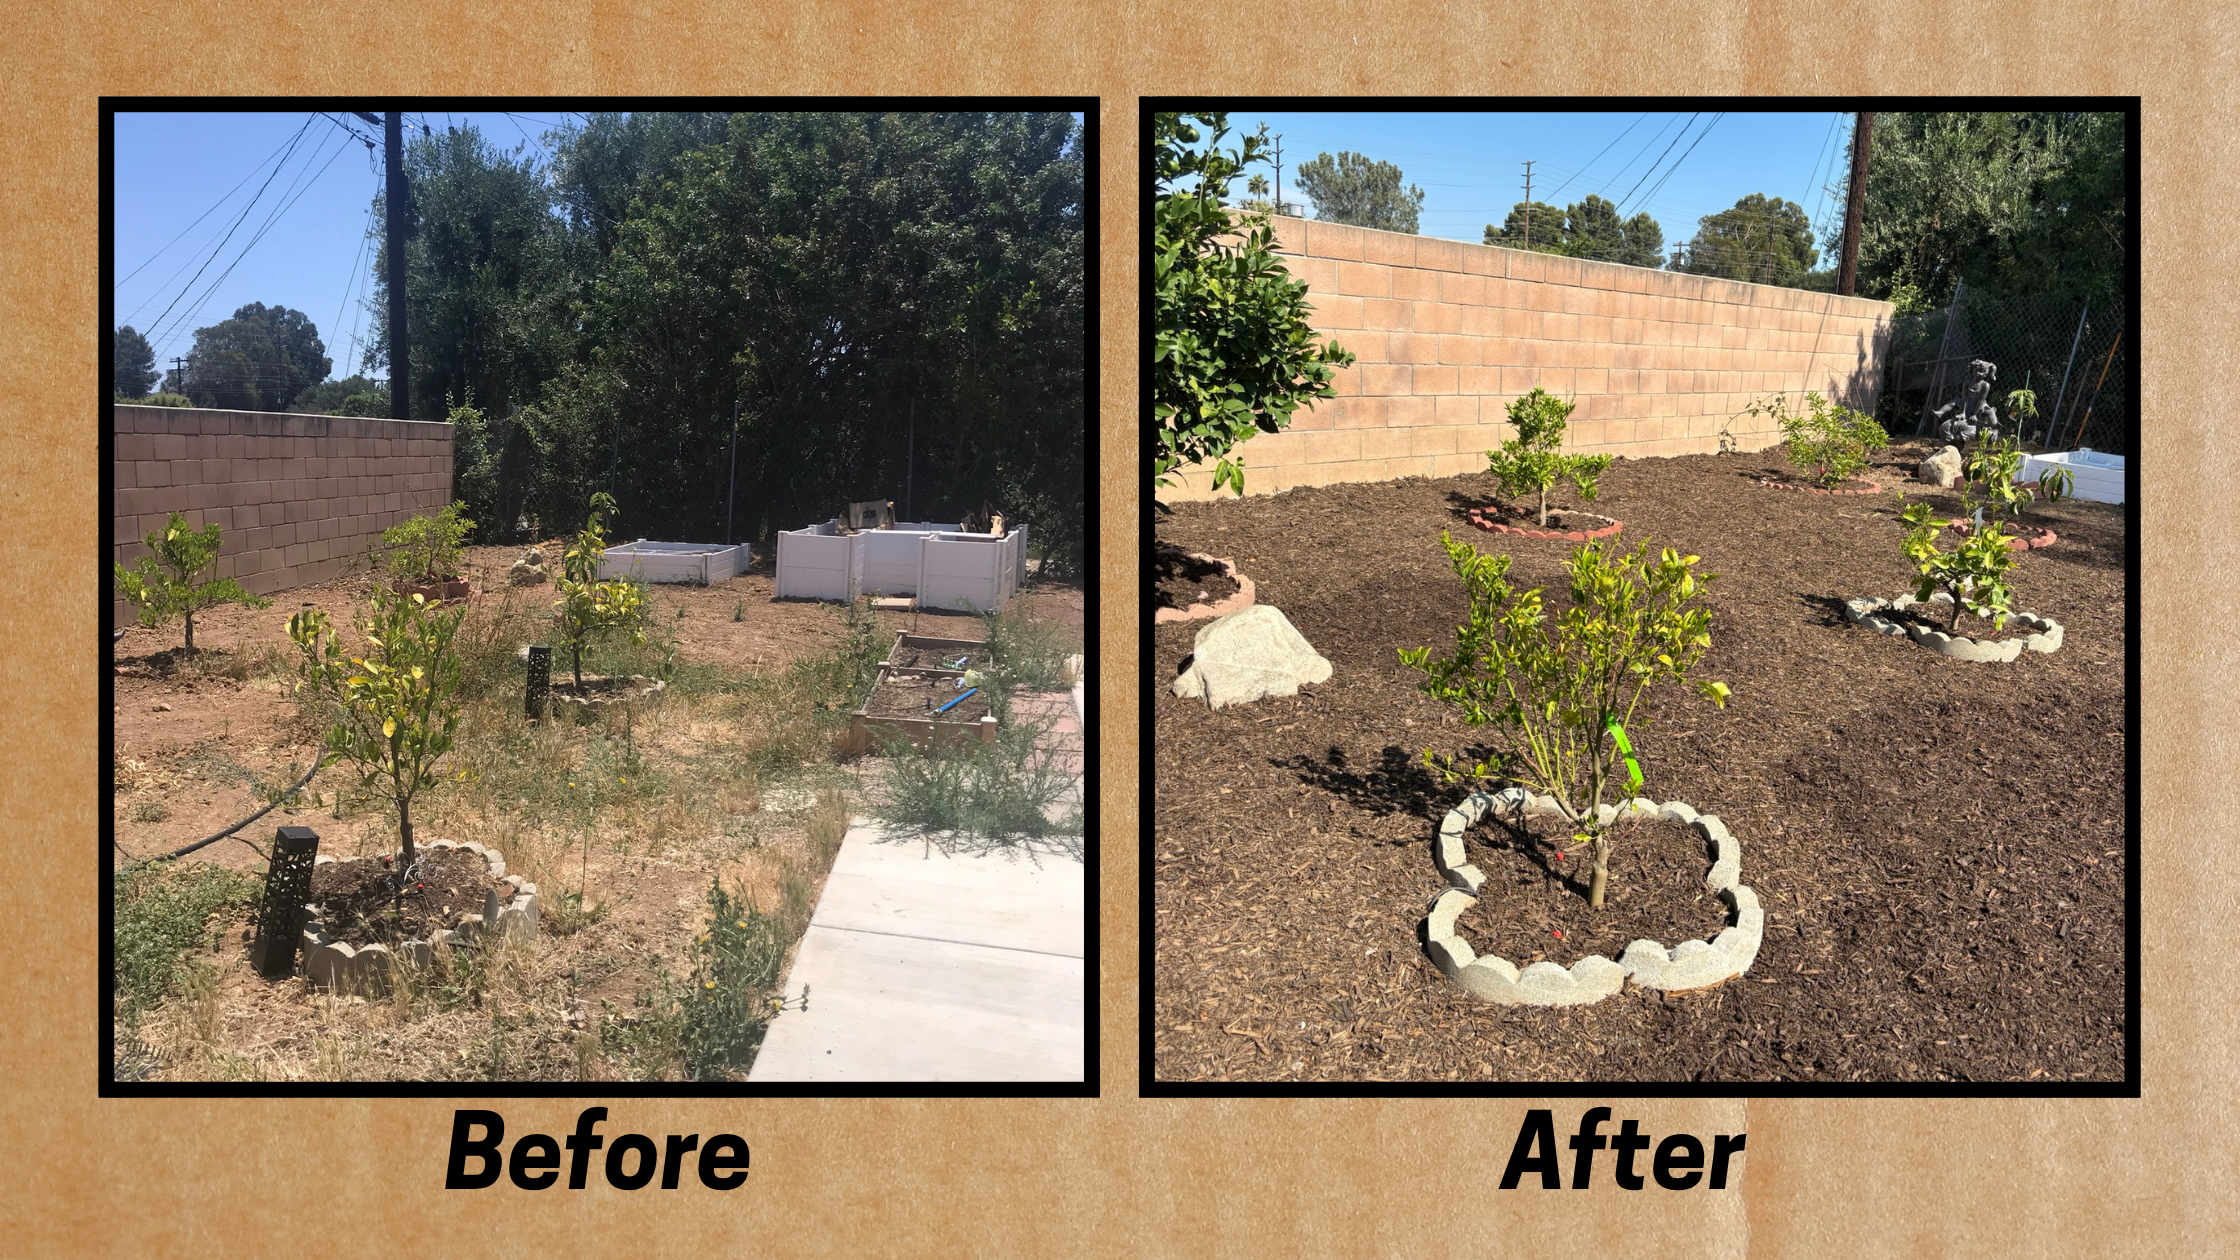

Mulching your garden has many benefits. It helps control weeds, retains moisture, and beautifies your garden. Mulch improves soil quality as it breaks down improving the health of the soil, plants, and trees. In this guide, I share my insights on how to mulch your garden for weed control, along with tips and techniques that work well for different garden types.
Step 1: Assess Your Garden and Calculate Mulch Needs
Your garden and its needs vary, so careful assessment is crucial before starting. I begin by checking the areas that need a fresh layer of mulch and noting if there is old mulch from previous seasons. For bare spots, I suggest a 3-inch layer. For areas covered in weeds, I suggest “sheet mulching” a paper or cardboard weed barrier to lay down first before you bring in the mulch, start collecting your paper and boxes. In areas with existing mulch from a year or two ago, adding an extra 1 to 2 inches early spring or winter to cover the airborne seeds that blew in during summer and fall will keep the garden healthy and looking its best.
Calculating Mulch Quantity:
- 1 cubic yard of mulch covers over 100 square feet or a 10×10-foot area at a 3-inch depth.
- Most bags of mulch contain about 2 cubic feet; since one cubic yard equals 27 cubic feet, you would need 12.50 bags. Use this link for a cubic yard calculator to help you convert your needs.
This calculation ensures you use the right amount of mulch while avoiding both over- and under-mulching. I always make sure to spread the mulch evenly to maximize moisture retention and prevent weed growth.
Step 2: Choose the Right Mulch for Your Garden
Mulch is not one-size-fits-all. Various types come with different features. I decide which type fits best by considering the plant species, the garden’s overall look, and the function you expect from the mulch.
Types of Mulch:
- Garden Mulch: This shredded, decomposed material works well for flower beds, vegetable gardens, and around trees. It adds nutrients to the soil as it breaks down.
- Bark and Wood Chips: These provide an eye-catching look while suppressing weeds, making them a good choice for shrubberies and landscaped areas.
- Rocks or Pebbles: For specialized gardens such as cactus gardens, rocks or pebbles complement the landscape. Note that these options can be more expensive than the garden mulch, bark and wood chips.
Choose the mulch type that best aligns with your garden’s needs. For example, garden mulch works well for most plants by fertilizing and retaining moisture, but it isn’t ideal for cacti that do better using rock.
Step 3: Prepare Your Garden
Before applying any mulch, proper preparation of the garden is very important. I clear the area of weeds, big tree branches, and old vegetation so that the new mulch performs effectively over time, and you get a clean look. If you are sheet mulching, clear the surface area, but no need to pull every weed out by the root. The treatment will block out the light and will be consumed by the earthworms.
Preparation Techniques:
- Remove all unwanted plant growth to clear the space for spreading the mulch.
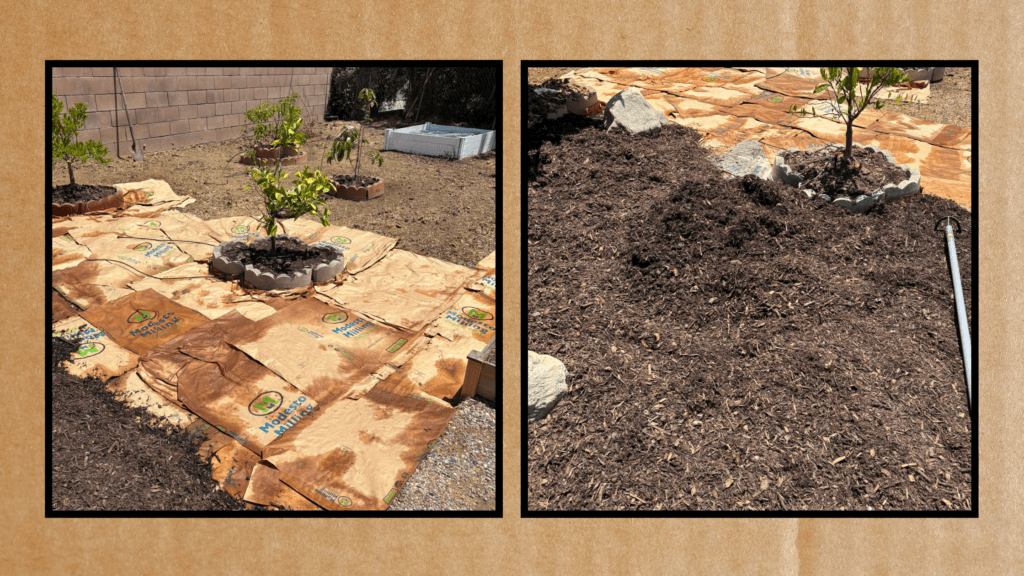
- For ultimate weed suppression, I use paper and cardboard, a method none as “sheet Mulching”. lay a base layer of newspaper or cardboard soaked in water. Use at least 3 or 4 pages of newspaper or one full layer of cardboard, overlapping the materials to block out sunlight. Any paper will work, but not the glossy print or glossy print on boxes. Both are toxic.
- DO NOT use glossy magazines or printed cardboard that might have harmful chemicals from 4-color process printing ink. The newspaper uses soy ink and is safe, but please remove any glossy magazine pages that may be included with the newspaper.
- Soak the ground thoroughly; this helps with water absorption and ensures smooth irrigation later on. I suggest planning to do “sheet mulching” after a rainy day.
- Where the garden meets the edge of a pathway, a sidewalk, or a stepping stone to keep weeds from finding the light, make a 3-inch relief below the edge to lock in the paper against the edge and cover with mulch. You will be glad you spent that extra time to keep a clean look for years to come.
- You can skip the weed barrier altogether if you need to and feel the weeds are not out of control. A 3-inch layer of mulch is technically thick enough to prevent the weed seed from sprouting. However, consider adding an extra weed barrier if you have an area full of seeds and weeds.
This method suppresses weeds but also, not the conventional weed cloth approach landscapers and gardeners use. I am a fan of using paper and have always worked great, leading to a healthier garden. Always place the base layer of paper before applying the top mulch layer. Works best when applying a new treatment with a thick 3-inch layer of mulch vs a 1-inch layer that paper or weed cloth may show through.
Step 4: Apply the Mulch
Once you know how much mulch your garden needs and you have your paper, cardboard, or weed cloth in place, it’s time to apply it. For a new application, aim for a 3-inch-thick layer. For areas with existing mulch, a top-up of 1 to 2 inches refreshes the coverage effectively.
Steps to Apply Mulch:
- Bring the mulch to the area and make piles all around the area.
- Use a wheelbarrow, a rolling trash can, or a dumping garden wagon to bring the mulch to the designated area.
- If you use bags, calculate how many are needed based on 2 cubic feet per bag and bring them to the area you want to mulch.
- Use a rock rake or a three-prong rake to spread the mulch carefully, not tearing into the weed barrier.
I take care to spread the mulch evenly, especially around the plants. Keep the mulch a few inches away from the plant’s trunk to prevent moisture buildup that can encourage rot, particularly for delicate and drought-tolerant species like cacti and California natives.
Step 5: Mulching Techniques and Personal Tips
Effective mulching goes beyond simply placing material on the soil. The methods used can significantly extend the lifespan and performance of the mulch. One tip I rely on is placing wet layers of newspaper or cardboard underneath the mulch; this not only suppresses weeds but also avoids the need for more expensive weed cloth materials, but it’s not just about the money. Using paper helps bring nutrients to the soil and improves the soil and the health of the plants over time, while weed cloth is permeable, letting water through it separates the natural order of decomposition to improve the soil health.
Mulching Tips:
- Spread the mulch evenly to ensure full coverage.
- Keep it several inches away from the plant trunk to prevent rot.
- Remember that wood chips or garden hummus break down over time and may need to be refreshed annually.
- If there is an existing mulch layer, lightly rake it to even the surface before applying new mulch.
These techniques protect plants and leave your garden with a neat, finished appearance.

Step 6: Maintain and Monitor Your Mulched Garden
Applying mulch is just the beginning; ongoing maintenance is key to keeping your garden healthy. I routinely inspect the mulch layer, ensuring it stays effective as the seasons change.
Maintenance Guidelines:
- Regularly check the thickness of the mulch, as organic materials decompose and may require an extra 1 to 2 inches.
- Inspect edges around pathways and planting areas to make sure the mulch has not shifted or piled against the trunk of the plant.
- During heavy rains, mulch can compact or wash away; if so, refresh or redistribute the layer as needed.
- If fungal growth or rot appears near the plant’s trunk, remove the affected mulch and adjust watering practices accordingly.
Regular monitoring preserves the mulch’s benefits and helps your garden remain vibrant.
Step 7: Frequently Asked Questions and Troubleshooting
How do I know if I have applied too much mulch?
If the mulch is piled too high, it can restrict air circulation and cause moisture issues at the plant base. I watch for mold or signs of rot as clues that the mulch might be too thick. Using a 3-inch layer on bare ground and a 1 to 2-inch top-up over old mulch is usually best.
What if my mulch keeps getting disturbed after heavy rains?
Heavy rainfall can shift the mulch. After a storm, I gently tamp it down and use a rake to redistribute it evenly.
Can I use any type of mulch with my plants?
No, not every mulch suits every plant. Organic mulch, for instance, might cause trunk rot when used around cacti. I choose mulches based on the plant’s natural requirements—decorative rocks work better for cacti, while garden mulch, bark, and woodchip are ideal for most other landscape plants.
This FAQ section answers common concerns. By troubleshooting these issues as they come up, you can adjust your approach to ensure a healthy, resilient garden.
Wrapping Up and Next Steps
Mulching your garden offers long-term benefits. The right mulch improves soil quality, controls weeds, retains moisture, and enhances the overall beauty of your outdoor space. In this guide, I explained how to assess your garden’s needs, select the proper mulch, prepare the garden or area, apply mulch accurately, and maintain a protective layer season after season.
Your Action Plan:
- Assess your garden by measuring the area and noting any existing mulch.
- Calculate the mulch needed using the cubic yard rule; 1 cubic yard covers over 100 square feet at a 3-inch depth, and adjust accordingly if topping up.
- Choose a mulch type that best suits your plants— garden mulch for most species or decorative rocks for xeric gardens like those for cacti.
- Prepare your gardens by clearing weeds and laying a base of wet newspaper or cardboard for extra suppression.
- Apply the mulch evenly, always leaving space around plant bases to avoid moisture buildup and rot.
- Monitor your mulch consistently and refresh or redistribute it as seasonal conditions change.
- Adjust your mulching methods based on plant responses to keep the garden healthy and inviting.
This action plan serves as a clear roadmap for anyone interested in stepping up their garden care with mulching. Following these practical steps has helped me maintain a vibrant, well-kept garden where plants thrive and the landscape feels welcoming. What will be your first step toward a more managed garden? Give these techniques a try and enjoy the lasting benefits.
Mulching is an essential practice for maintaining a healthy and thriving garden, and this guide does an excellent job of breaking down the process into clear, actionable steps. I appreciate the detailed approach to assessing mulch needs and calculating the right quantity—avoiding over- or under-mulching can make a big difference in plant health. The explanation of different mulch types is also valuable, as it helps gardeners choose the best option for their specific plants and landscape aesthetics.
One of the standout tips in this guide is the use of wet newspaper or cardboard as a natural weed barrier. This method is not only cost-effective but also environmentally friendly, promoting soil enrichment as the material decomposes. The step-by-step application process, including spacing mulch away from plant bases, ensures proper moisture retention without risking rot.
The maintenance and troubleshooting sections are especially useful, addressing common issues like mulch shifting during heavy rains or excessive layering leading to air circulation problems. Overall, this guide provides a comprehensive, practical approach to mulching that both beginners and experienced gardeners can benefit from. Well done!